Creating a Perforce (P4) Render Job
This guide walks you through configuring Perforce-integrated render job data assets so you can submit Perforce-integrated render jobs to AWS Deadline Cloud from Unreal Engine.
Prerequisites
Before submitting a Movie Render Queue (MRQ) job from Unreal Engine in a Perforce repository:
✅ Unreal Project Setup
- Project must be within the Perforce workspace
- Verify Perforce connection is established and you're logged in
✅ Deadline Cloud Setup
- Complete submitter setup
- Configure Perforce credentials for workers
✅ Perforce Requirements
- Valid Perforce workspace with project files
- Appropriate Perforce permissions for sync operations
Perforce Render Job Architecture
P4 Render Jobs extend the standard render job with Perforce synchronization capabilities:
📦 Deadline Cloud Perforce Render Job
├── 🌍 Environments
│   ├── 🔐 Apply Perforce Credentials from AWS Secrets Manager
│   ├── 🔄 Sync Perforce Environment (CMF/SMF)
│   │   └── Initializes Perforce workspace and syncs repository on workers
│   └── 🚀 Launch UE Environment
│       └── Starts Unreal Engine with Perforce workspace paths
└── 📋 Steps
    └── 🎬 Render Step
        └── Executes Movie Render Queue process
Key Differences from Standard Jobs: - Credential Management: Secure Perforce credential application from AWS Secrets Manager - Repository Sync: Additional Perforce sync environment for workspace management - Path Resolution: Environment variables reference Perforce workspace paths - Dependency Collection: Automatic collection and sync of Perforce-tracked assets
Setting Up Perforce Render Job Components
Follow these steps to create the required data assets for Perforce-integrated render jobs:
1. Create Apply Perforce Credentials Data Asset
Set up an OpenJD Environment for retrieving Perforce credentials from AWS Secrets Manager and applying them to the Perforce connection.
🔒 Security Note: Environment variables appear in logs with the "openjd_env" prefix, but sensitive data (port, user, password) is automatically redacted for security.
Configuration Steps:
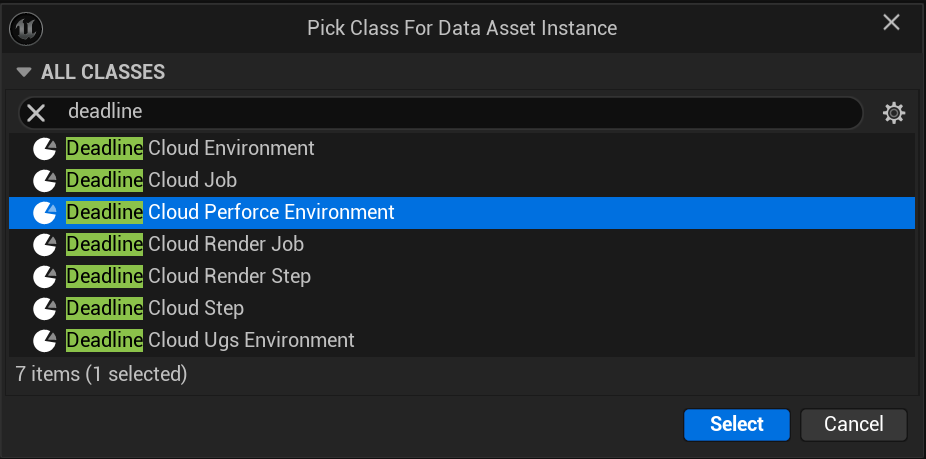
1. Create a new Deadline Cloud Perforce Environment data asset
-
Name the data asset descriptively (e.g., "ApplyP4SecretEnv")
-
Select the
p4_apply_secrets_environment.ymltemplate fromContent/Python/openjd_templates/p4/ -
Configure the secret reference:
- Enter your Perforce credential secret name in "AWS_SECRET_P4INFO"
- This should match the secret name created in Perforce Credentials Management

2. Create Perforce Sync Environment Data Asset
Set up an OpenJD Environment for creating a Perforce workspace, syncing files from the Perforce server, and cleaning up the workspace after rendering.
Configuration Steps: 1. Create a new Deadline Cloud Perforce Environment data asset
- Name the data asset based on your fleet type:
- "P4SyncSMFEnv" for Service Managed Fleet (SMF)
-
"P4SyncCMFEnv" for Customer Managed Fleet (CMF)
-
Select the appropriate template from
Content/Python/openjd_templates/p4/: - SMF:
p4_sync_smf_environment.yml -
CMF:
p4_sync_cmf_environment.yml -
Configure the secret reference:
- Enter your Perforce credential secret name in "AWS_SECRET_P4INFO"
- Must match the secret from step 1

3. Create Perforce Launch UE Environment Data Asset
Set up an OpenJD Environment for launching Unreal Engine with Perforce integration. This automatically references the Perforce workspace created by the sync environment.
Configuration Steps: 1. Create a new Deadline Cloud Environment data asset
-
Name the data asset descriptively (e.g., "P4LaunchUEEnv")
-
Select the
p4_launch_ue_environment.ymltemplate fromContent/Python/openjd_templates/p4/ -
Configure environment settings:
- Set "REMOTE_EXECUTION" to
True - This enables remote rendering capabilities

4. Create Perforce Render Step Data Asset
Set up an OpenJD Render Step for executing the rendering process.
Configuration Steps:
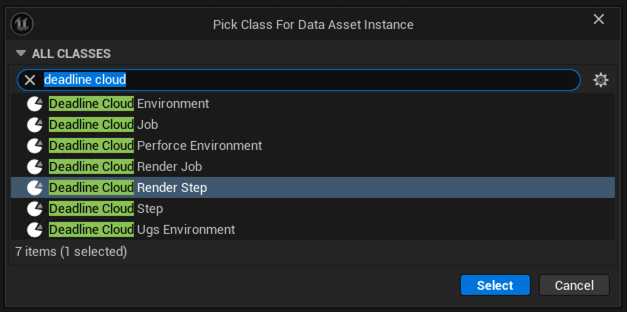
1. Create a new Deadline Cloud Render Step data asset
-
Name the data asset descriptively (e.g., "P4RenderStep")
-
Select the
p4_render_step.ymltemplate fromContent/Python/openjd_templates/p4/
5. Create Perforce Render Job Data Asset
Set up an OpenJD Render Job that orchestrates the entire rendering workflow.
Configuration Steps:
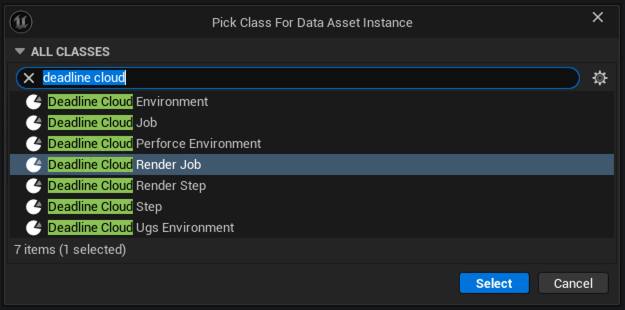
1. Create a new Deadline Cloud Render Job data asset
-
Name the data asset descriptively (e.g., "P4RenderJob")
-
Select the
p4_render_job.ymltemplate fromContent/Python/openjd_templates/p4/ -
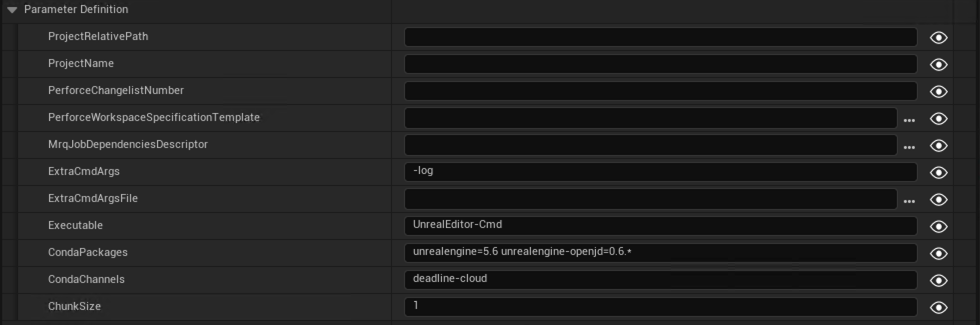
Review Parameter Definitions: The template includes these parameters with their default behaviors:
| Parameter | Description | Auto-filled | Action Required |
|---|---|---|---|
ProjectRelativePath |
Project path relative to Perforce workspace root | ✅ | Leave empty - Auto-populated |
ProjectName |
Project name for Perforce workspace creation | ✅ | Leave empty - Auto-populated |
PerforceChangelistNumber |
Perforce changelist to sync workspace to | ✅ | Leave empty - Auto-populated |
PerforceWorkspaceSpecificationTemplate |
Perforce client spec with {workspace_name} token |
✅ | Leave empty - Auto-populated |
MrqJobDependenciesDescriptor |
JSON file with MRQ dependencies for sync | ✅ | Leave empty - Auto-populated |
ExtraCmdArgsFile |
File for extra args (avoids 1024 char limit) | ❌ | Optional - Use default for standard setups |
FramesPerTask |
Number of frames to render per task | ❌ | Optional - Use default (0) to divide tasks by shots |
ExtraCmdArgs |
Additional Unreal launch arguments | ❌ | Optional - Use default for standard setups |
Executable |
Unreal executable name for render node | ❌ | Configure - Use default for standard setups |
CondaPackages |
Conda packages needed to render the job | ❌ | Configure - Use default for standard setups |
CondaChannels |
Conda channels where packages are stored | ❌ | Configure - Use default for standard setups |
ChunkSize |
Number of shots grouped in a single render session | ❌ | Configure - Default: 1 (tune for performance) |
📝 Legend: ✅ = Auto-populated during submission, ❌ = No Auto-populated
Parameter Configuration Guidelines: - Auto-populated parameters: Leave these empty - they're filled automatically during job submission - Manual parameters: Review defaults and adjust based on your specific requirements - ChunkSize: Start with 1, increase for better performance with simple shots
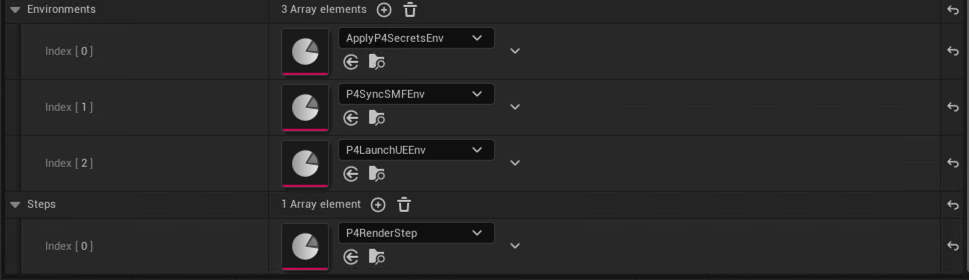
- Configure Environments (in this exact order):
| Order | Environment | Purpose |
|---|---|---|
| 1st | "ApplyP4SecretEnv" | Apply Perforce credentials from AWS Secrets Manager |
| 2nd | "P4SyncSMFEnv" or "P4SyncCMFEnv" | Sync Perforce workspace and files |
| 3rd | "P4LaunchUEEnv" | Launch Unreal Engine with Perforce paths |
⚠️ Critical: Environment order is essential for proper dependency resolution and credential flow
- Add Render Step: Add "P4RenderStep" to the Steps section
Best Practices
Pre-Submission Checklist
- ✅ Credentials: Perforce credentials properly configured (see guide)
- ✅ Workspace: Specification includes all necessary view mappings
- ✅ Testing: Test with small render task before large job submissions
- ✅ Dependencies: Verify all project dependencies are in Perforce and accessible
- ✅ Permissions: Confirm worker roles have access to AWS Secrets Manager
Performance Optimization
Chunk Size Configuration:
| Chunk Size | Use Case | Performance Impact |
|---|---|---|
| 1-2 shots | Complex shots, detailed review needed | Lower throughput, higher quality control |
| 4-8 shots | Balanced workload, typical projects | Optimal balance of speed and manageability |
| 10+ shots | Simple shots, batch processing | Maximum throughput, minimal overhead |
Additional Optimizations: - Dependencies: Minimize unnecessary asset dependencies to reduce sync time - Workspace Views: Optimize Perforce workspace views to sync only required files
Monitoring and Debugging
- Job Logs: Monitor Perforce sync process in job execution logs
- Workspace Status: Check workspace creation and sync completion
- Dependency Collection: Verify all required assets were captured
- Performance Metrics: Track sync times and render performance
Troubleshooting
Common Issues and Solutions
| Issue | Symptoms | Solution |
|---|---|---|
| P4 Connection Failures | Authentication errors, timeout | • Verify Perforce credentials • Check network connectivity • Validate Perforce server accessibility |
| Workspace Sync Errors | Sync failures, permission denied | • Check Perforce user permissions • Verify workspace specification • Ensure changelist exists |
| Missing Dependencies | Render failures, missing assets | • Review MrqJobDependenciesDescriptor• Check soft references collection • Verify all assets in Perforce |
| Path Resolution Issues | File not found errors | • Verify P4_CLIENT_DIRECTORY variable• Check environment order • Validate workspace root paths |
Debug Steps
- Check Job Logs: Review Perforce sync environment logs for detailed error messages
- Validate Workspace: Ensure Perforce workspace specification is correct
- Test Locally: Verify Perforce operations work from submitter machine
- Verify Permissions: Confirm worker roles have secret access (if using Secrets Manager)